
Klustron Installation Guide
Klustron Installation Guide
This guide uses a cluster management system installation script to install the cluster management system.
1. Klustron Environment Information
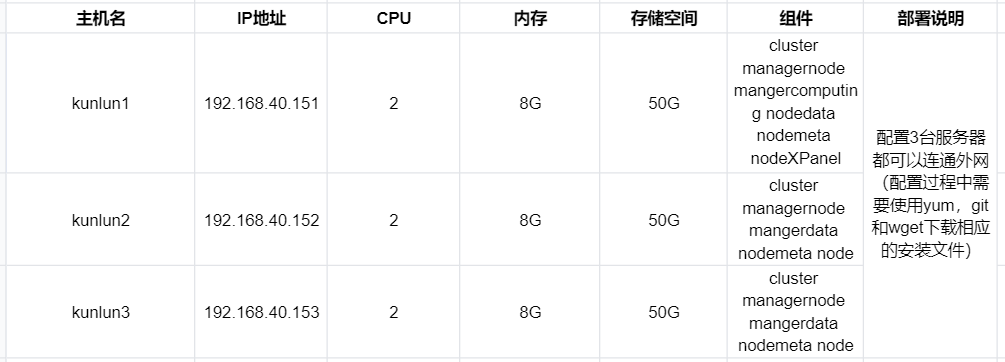 Note: The Linux version used in this installation guide is CentOS 7.9 64bit.
2. Pre-installation Preparation
2.1 [kunlun1,kunlun2,kunlun3] Remove the system-installed MariaDB.
Run the following commands as root:
yum remove postfix
rpm -e mariadb-libs
2.2 [kunlun1,kunlun2,kunlun3] Disable the firewall on each server.
Run the following commands as root:
systemctl stop firewalld
systemctl disable firewalld
2.3 [kunlun1,kunlun2,kunlun3] Create the kunlun group and user.
Run the following commands as root and set the user password:
useradd --create-home --shell /bin/bash kunlun
passwd kunlun
2.4 [kunlun1,kunlun2,kunlun3] Create the software installation directory /kunlun and set the directory's group to kunlun:kunlun.
Run the following commands as root:
mkdir /kunlun
chown -R kunlun:kunlun /kunlun
2.5 [kunlun1,kunlun2,kunlun3] Modify the operating system parameters.
Run the following commands as root:
vi /etc/security/limits.conf
#Add the following lines:
* soft nofile 65536
* hard nofile 200000
2.6 [kunlun1,kunlun2,kunlun3] Allow the kunlun user to execute root commands via sudo without a password.
Run the following commands as root:
vi /etc/sudoers
#Add the following line at the end:
Kunlun ALL=(ALL) NOPASSWD: ALL
2.7 [kunlun1,kunlun2,kunlun3] Configure the ssh password-free authentication of the kunlun user on kunlun1 to kunlun2 and kunlun3.
Log in to the kunlun1 server as the kunlun user and run the following commands:
ssh-keygen -t rsa
After running this command, simply press Enter for all prompts. The command generates two files, id_rsa and id_rsa.pub, in the .ssh directory in the user's home directory. id_rsa is the private key file and id_rsa.pub is the public key file.
Copy the public key of kunlun1 to the kunlun1, kunlun2, and kunlun3 servers:
ssh-copy-id -i  .ssh/id_rsa.pub kunlun@192.168.40.151
ssh-copy-id -i  .ssh/id_rsa.pub kunlun@192.168.40.152
ssh-copy-id -i  .ssh/id_rsa.pub kunlun@192.168.40.153
Execute the following commands on kunlun1 to verify passwordless login of kunlun user to kunlun1, kunlun2, and kunlun3:
ssh 192.168.40.151 date
ssh 192.168.40.152 date
ssh 192.168.40.153 date
2.8 [kunlun1,kunlun2,kunlun3] Install tools such as python2, git, and wget.
Run the following commands as root:
yum -y install python git wget yum-utils
2.9 [kunlun1] Install and deploy docker on kunlun1 in advance, as xpanel is planned to be deployed on it.
Run the following commands as root:
Remove system-provided docker-related rpm:
yum remove docker \
        docker-client \
        docker-client-latest \
        docker-common \
        docker-latest \
        docker-latest-logrotate \
        docker-logrotate \
        docker-engine
Switch to Aliyun mirror:
yum-config-manager \
    --add-repo \
    http://mirrors.aliyun.com/docker-ce/linux/centos/docker-ce.repo
Install docker community edition:
yum -y install docker-ce docker-ce-cli containerd.io
Start docker and set it to start with the operating system:
systemctl start docker
systemctl enable docker
2.10 [kunlun1] Create the directory /softwares and assign appropriate permissions on kunlun1, which will be used to store installation media related to Klustron.
Run the following commands as root:
mkdir /softwares
2.11 [kunlun1] Use git to pull the latest code and store it in the /softwares directory on kunlun1.
Run the following commands as root:
cd /softwares
git clone https://gitee.com/zettadb/cloudnative.git
2.12 [kunlun1] Download the necessary software packages.
Run the following commands as root:
cd /softwares/cloudnative/cluster/clustermgr
wget http://zettatech.tpddns.cn:14000/thirdparty/hadoop-3.3.1.tar.gz
wget http://zettatech.tpddns.cn:14000/thirdparty/jdk-8u131-linux-x64.tar.gz
wget http://zettatech.tpddns.cn:14000/thirdparty/mysql-connector-python-2.1.3.tar.gz
wget http://zettatech.tpddns.cn:14000/thirdparty/prometheus.tgz
wget http://zettatech.tpddns.cn:14000/thirdparty/haproxy-2.5.0-bin.tar.gz
wget http://zettatech.tpddns.cn:14000/thirdparty/efk/filebeat-7.10.1-linux- x86_64.tar.gz
VERSION=1.2.2
wget http://downloads.kunlunbase.com//releases/$VERSION/release-binaries/kunlun-cluster-manager-$VERSION.tgz
wget http://downloads.kunlunbase.com//releases/$VERSION/release-binaries/kunlun-node-manager-$VERSION.tgz
wget http://downloads.kunlunbase.com//releases/$VERSION/release-binaries/Klustron-server-$VERSION.tgz
wget http://downloads.kunlunbase.com//releases/$VERSION/release-binaries/Klustron-storage-$VERSION.tgz

chown -R kunlun:kunlun /softwares/
3. Klustron Installation
3.1 [kunlun1] Use the kunlun user to modify the file /softwares/cloudnative/cluster/cluster_and_node_mgr.json and add the relevant configuration information.
{
    "machines":[
        {
            "ip":"192.168.40.151",
            "basedir":"/kunlun",
            "user":"kunlun"
        },
        {
            "ip":"192.168.40.152",
        	"basedir":"/kunlun",
            "user":"kunlun"
        },
        {
            "ip":"192.168.40.153",
            "basedir":"/kunlun",
            "user":"kunlun"
        }
    ],
    "meta":{
    	"ha_mode": "mgr",
        "nodes":[
         {
         "ip":"192.168.40.151"
                },
                {
         "ip":"192.168.40.152"
                },
                {
         "ip":"192.168.40.153"
                }
        ]
    },
    "cluster_manager": {
           "nodes": [
        {
         "ip": "192.168.40.151"
        },
        {
         "ip": "192.168.40.152"
        },
        {
         "ip": "192.168.40.153"
        }
        ]
    },
    "node_manager": {
           "nodes": [
        {
         "ip": "192.168.40.151"
        },
        {
         "ip": "192.168.40.152"
        },
        {
         "ip": "192.168.40.153"
        }
        ]
    },
    "xpanel": {
    "ip": "192.168.40.151",
    "image": "registry.cn-hangzhou.aliyuncs.com/kunlundb/kunlun-xpanel:1.0.2"
    }
}
3.2 [kunlun1] Generate the installation script.
Run the following commands as root:
cd /softwares/cloudnative/cluster
python setup_cluster_manager.py --autostart --config=cluster_and_node_mgr.json --product_version=1.2.2 --action=install
3.3 [kunlun1] Run the installation script.
Run the following commands as root:
bash -e /softwares/cloudnative/cluster/clustermgr/install.sh
If there are any errors during the script execution, refer to 3.4 to clean up the intermediate results of the installation, and re-execute the installation script after fixing the issue.
**3.4 **[kunlun1] If the installation script fails to run in step 3.3, you can generate a cleanup script with the following command and run the cleanup steps.
Run the following commands as root:
cd /softwares/cloudnative/cluster

python setup_cluster_manager.py --autostart --config=cluster_and_node_mgr.json --product_version=1.0.2 --action=clean

bash /softwares/cloudnative/cluster/clustermgr/clean.sh
3.5 Login to the XPanel console. Open a browser on a machine that can access 192.168.40.151 and enter the address: http://192.168.40.151:18080/KunlunXPanel/#/login?redirect=%2Fdashboard
The initial login username and password are: super_dba/super_dba. You need to change the super_dba password for the first login.
After logging in, the homepage will appear as follows: 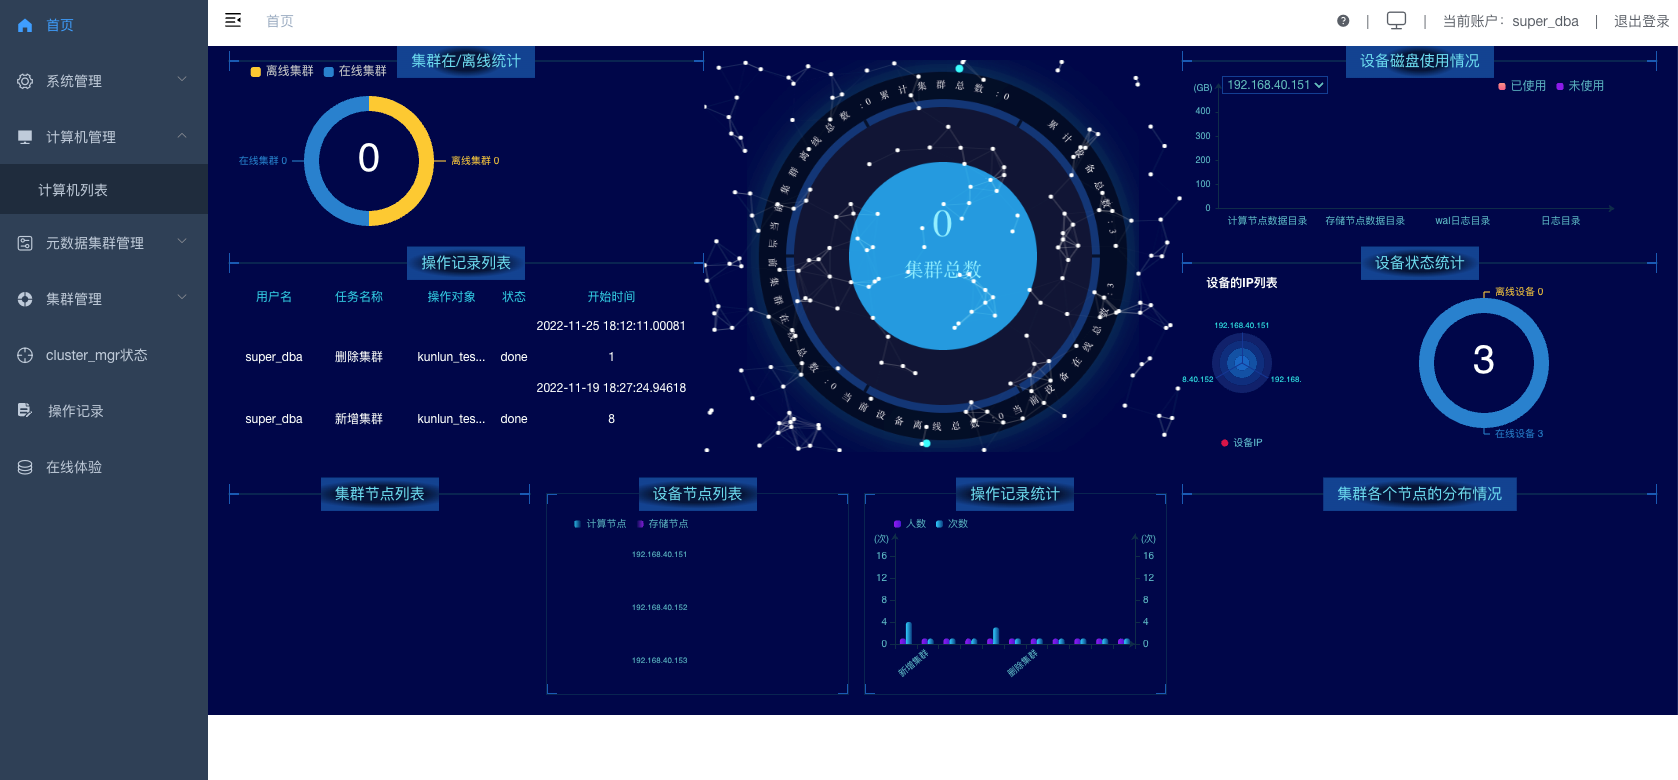
3.6 Click the "Computer Management" and "Computer List" tabs on the left control panel to display the following interface.
Check that all machines are online. 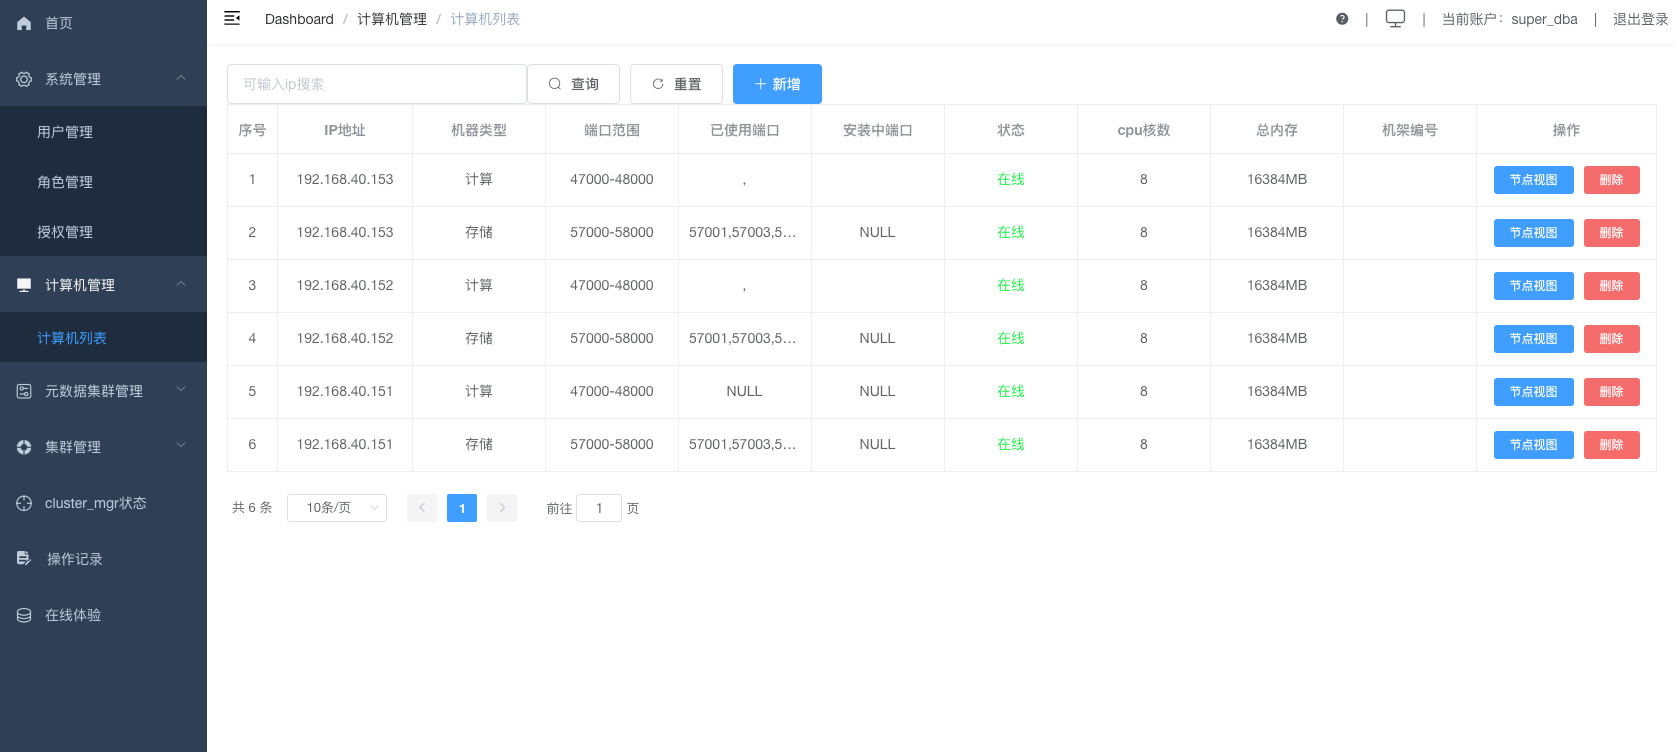
3.7 Add a cluster.
Click "Cluster Management", "Cluster List", and then click the "New" button. 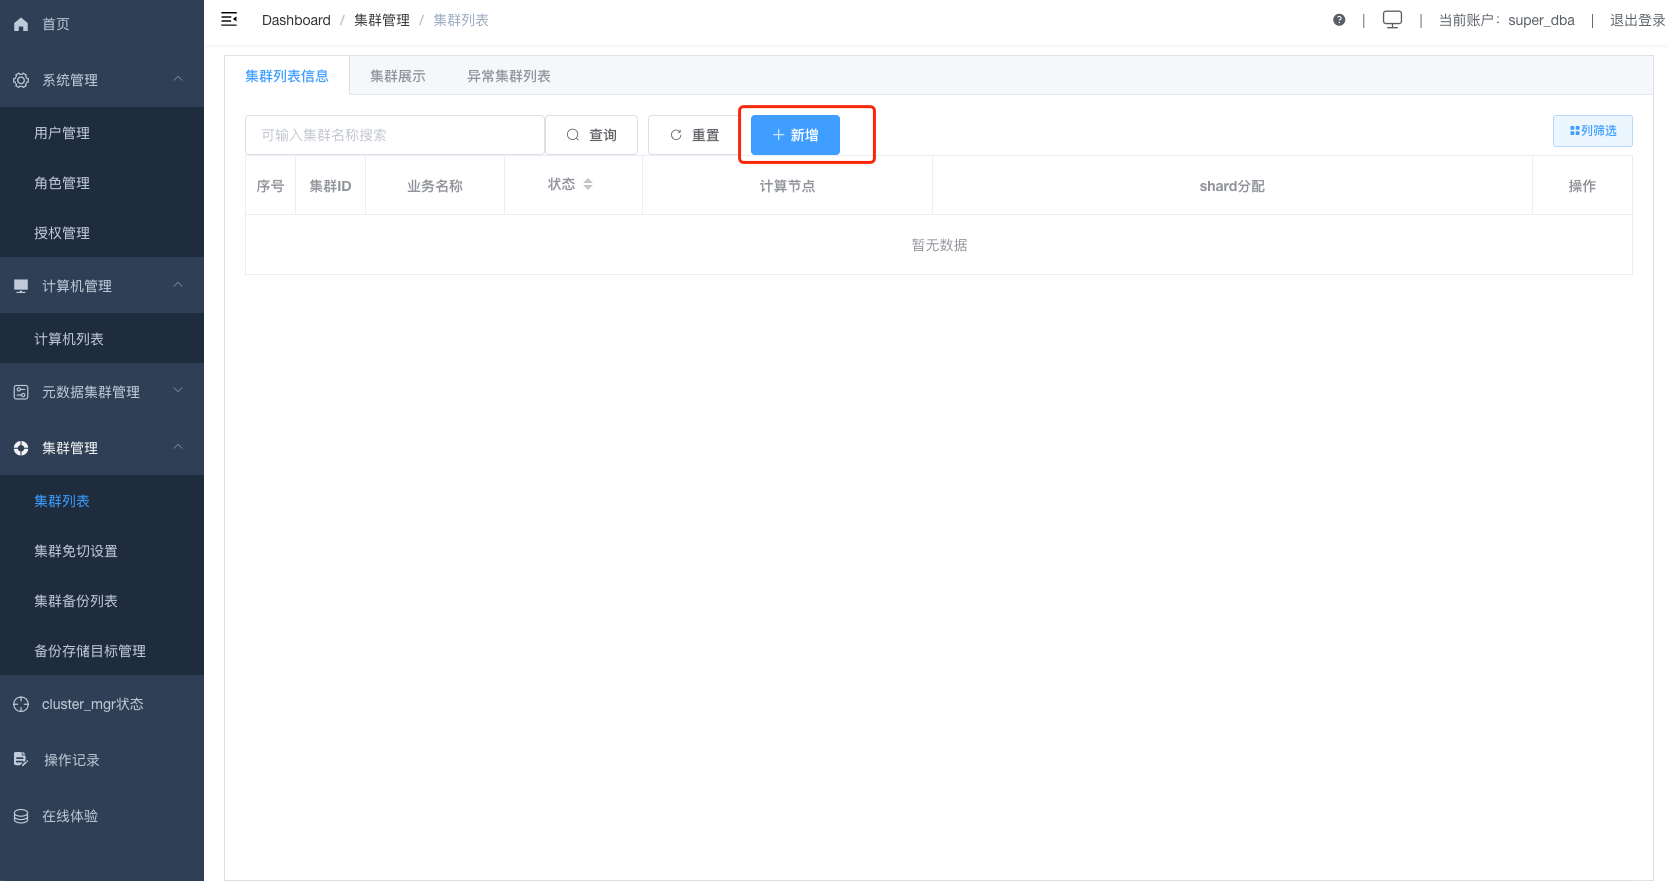
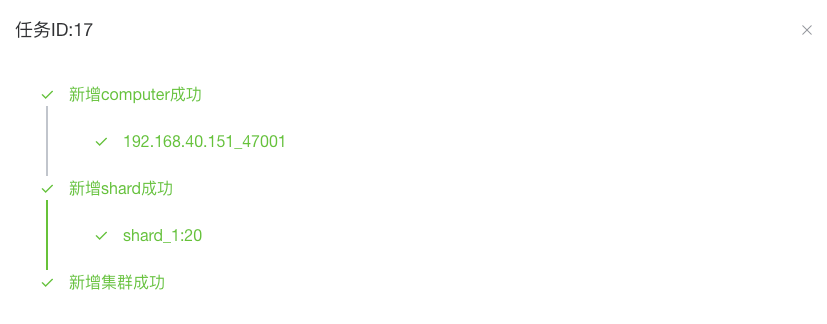
Add the cluster parameters as shown in the figure below: 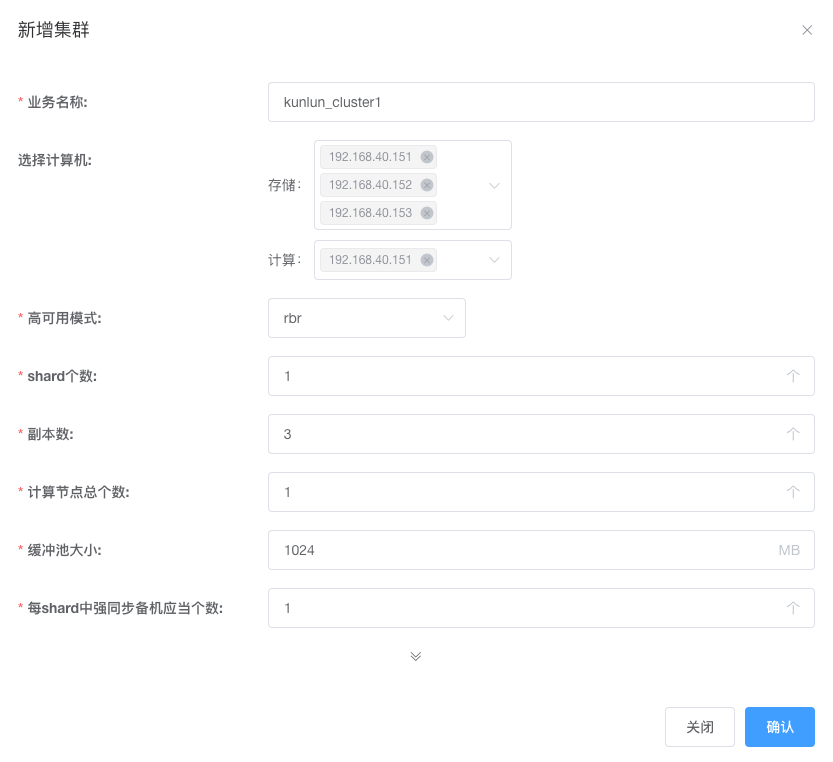 Click "Confirm" and check the installation status of the task to create the cluster.
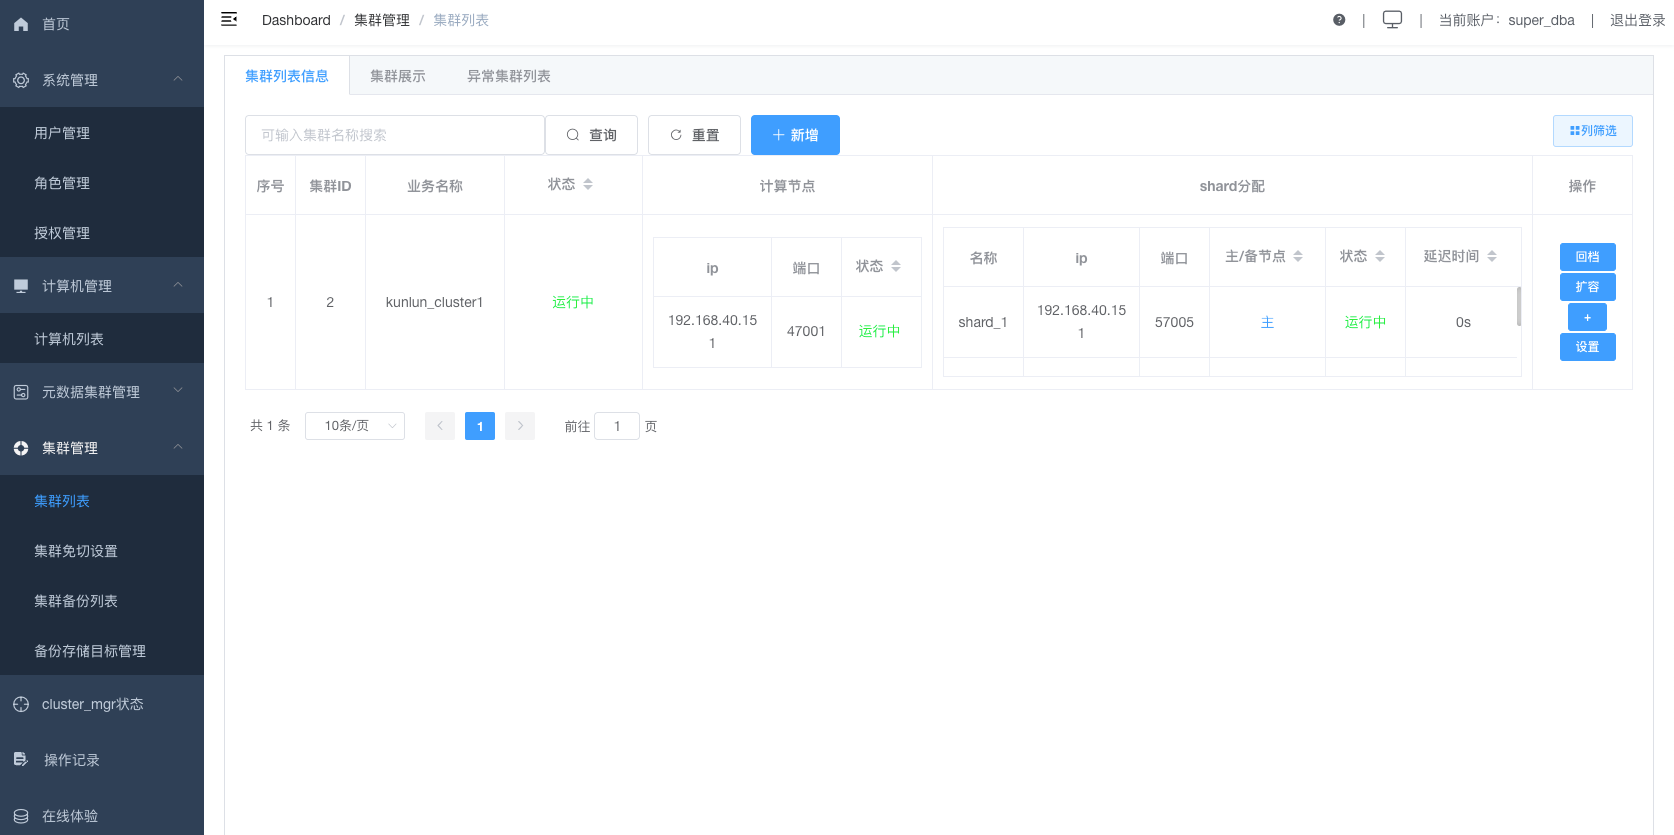 After completing the cluster installation, you can use the database.